Dirax Wrap -Around Sleeve and Epoxy System Install Guide
A high performance fiberglass reinforced sleeve specifically designed
for girth weld corrosion protection on pipes used in directional
drilling applications.
Materials and Equipment Needed:
- Appropriate size DIRAX kit
- Raychem epoxy primer kit (type S1239 or
S1301 or S1301M)
- Raychem propane torches plus
accessories (or equivalent)
- Temperature measurement equipment with
contact pyrometer
- Standard safety equipment as prescribed
by local regulations
- Heat resistant gloves
- Painter’s knife
- Raychem flat silicone roller
Notes:
-For pipes 16” (400 mm) and larger, two equipped installers are recommended.
-The surface to be covered by the DIRAX should be free from all foreign materials such as dirt, rust, oil, grease and moisture.
-If the pipe is not already factory bevelled,bevel the line coating edges on both sides of the welded joint to 30° or less.
Optional (when metal belt is used)
-EQ-DI - clamp tool
-EQ-DI - metal belt 25 X 0.8-EQ-DI
- hand strapper-EQ-DI
- pneumatic strapper
-EQ-DI - seal

Clean exposed steel and adjacent pipe
coating to be covered by DIRAX sleeve.
Remove all contaminants such as oil. Use a
solvent that contains no grease or oil type
materials.
coating to be covered by DIRAX sleeve.
Remove all contaminants such as oil. Use a
solvent that contains no grease or oil type
materials.

If not factory beveled, chamfer the adjacent pipe coating to an angle of preferably 15°, maximum
30°. Inspect the edge of the existing pipe coating. Disbonded sections have to be trimmed of and the
coating edge has to be beveled again. To avoid possible contamination, it is recommended to use a scraper.

Grid blast or sand blast the steel surface to remove loose and foreign materials. The surface should be cleaned to SIS 055900 -SA 21/2.

Grid or sand blast the adjacent pipe coating over a distance of at least 200 mm (8"). The total width should be approximately 50 mm larger than the width of the Raychem supplied DIRAX sleeve.
Note: prior to blasting, it is recommended to preheat the exposed steel to 40 - 50° C to avoid flash rust formation.

Wipe the surface to remove dust and remaining blasting material. Use a clean dry cloth or air blow.

Dose the two component Raychem epoxy. Use pre-dosed Raychem epoxy kits or use Raychem calibrated epoxy pumps. For pre-dosed Raychem epoxy kits, pour content ofcan B into can A and mix for approximately 1 minute. For easy disposal, it is recommended to pour this mixture back into can B and mix for another 30 seconds. As such, the remaining epoxy in both cans will cure and can be easily disposed off. Follow local regulations for safe disposal.
Mixed epoxy primer has a pot life of approximately 30 minutes at ambient temperature. As long as the epoxy primer is still liquid, it may be used. For easy mixing and dispensing, the epoxy primer should be used at a temperature of min. 18° C.When necessary, keep the epoxy primer at a heated place or use a Raychem epoxy heater.

Preheat the bare steel surface and adjacent coating to minimum 70°C (160°F), using propane torches. Adjust flame length to approximately 20" (500 mm). In cold conditions extra heavy preheat torches can be used. Check preheat temperature with a contact pyrometer.

Using the supplied applicator pad, apply the mixed epoxy primer over the entire surface to be covered. (When PE line coating is used,no primer should be applied over the polyethylene line coating.)

Immediately after application of the epoxy primer, and while the epoxy primer is still wet, loosely wrap the DIRAX sleeve centrally around the welded joint. If present, remove the protective release plastic from the adhesive side of the DIRAX sleeve. Wrap the sleeve (adhesive side down)around the area to be coated. Make sure the sleeve overlaps the end of the inner layer by at least 50 mm (2”).

Preheat the inside adhesive layer just next to the closure for a few seconds, and press down on the sleeve end to make it stick to the other end.
Using a Raychem propane torch with a flame length of approximately 500 mm (20”), start heating one end of the closure area.
Immediately pat it down firmly with a gloved hand. Continue heating and patting every 10 cm (4”) until the whole patch area is finished.

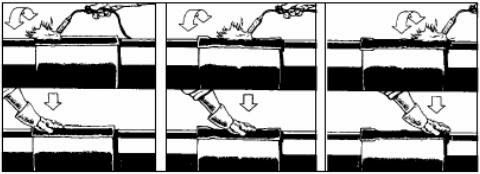
Start heating the sleeve at the side of the leading edge, the side that first comes in contact with the ground forces. Move the torch continuously in a paint brush motion all the way around the sleeve.

After you have finished heating the side at the leading edge, recover the remainder of the sleeve by heating toward the other end of the sleeve.

During shrink down, check adhesive flow with finger occasionally. Wrinkles should disappear automatically.

After the DIRAX sleeve has shrunk into the joint area and while it is still hot and soft, run a small hand roller over it to push out any trapped air.
Pay particular attention to the weld and cutback area. Reheat areas if necessary.

The sleeve is fully recovered when all of the following have occurred:
-The sleeve has fully conformed to the pipe and adjacent coating.
-There are no cold spots or dimples on the sleeve surface.
-Weld bead profile and other step downs can be seen through the sleeve.
-Adhesive flow is evident on both edges,after sleeve is cool.

An 80 mm (3.2”) wide sacrificial sleeve is installed on the leading edge to function as a wear cone during pull thru of the pipe. Start by heating the leading edge area to70°C (160°F).

Wrap the leading edge sleeve over the transition DIRAX - mill coating. Make sure that the closure is placed away from the main sleeve closure. Preheat the inside adhesive layer just next to the closure for a few seconds. Press down to make it stick to the other sheet end.

Heat the closure area and immediately pat it down with a gloved hand.

Shrink the leading edge sleeve down by moving the torch all the way around the pipe in a paintbrush motion. Make sure the sleeve has fully shrunk and adhesive flow is evident on both edges.

Smooth down the edges of the sleeve with the Raychem silicone hand roller. Sleeve is fully recovered when all the following have occurred:
-The sleeve has fully conformed to the pipe and adjacent coating.
-There are no cold spots or dimples on the sleeve surface.
-Weld bead profile and other step downs can be seen through the sleeve.
-Adhesive flow is evident on both edges after sleeve is cool.
Before the DIRAX can be exposed to the soil forces the joint should be cooled down to ambient temperature.
No comments:
Post a Comment