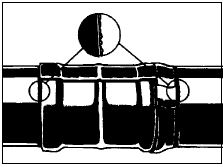
Raychem / Covalence DIRAX
Installed On Cured Protal 7200
Materials and Equipment Required:
·
Appropriate sized DIRAX kit
·
Approved adjustable Propane Torches w/ regulator
·
Temperature measuring equipment (contact
pyrometer)
· Standard
safety equipment
·
Heat resistant gloves
·
Silicone roller
Lightly abrade Protal
7200 and ARO coating adjacent to field joint, then use a solvent to remove all
oil, grease, mud and dust from the area where the DIRAX will be installed.
Mix the S1301M Epoxy
Primer. Pour smaller can into larger
can. Mix for approximately 1
minute. If working in cooler weather,
keeping epoxy inside of a truck (at a slightly warmer temperature) can make the
epoxy easier to mix.
Using a propane torch
with a broad, bushy, yellow flame, gently preheat Protal 7200 and adjacent ARO
where the DIRAX will be installed to a temperature in the 160F range
(minimum: 140F; maximum: 180F). The purpose of this preheat is to most
efficiently use the S1301M epoxy primer, minimizing wastage. Check preheat temperature with a contact
pyrometer.
Use the supplied
applicator pad to apply the mixed epoxy primer over the entire surface to be
covered (Protal 7200 and ARO).
Note: When installing 12” wide
sleeves on a 12” OD pipe – each individual epoxy kit contains enough epoxy to
coat 3 field joints.
Immediately after
application of the S1301M epoxy primer, and while the primer is STILL WET,
loosely wrap the DIRAX sleeve centrally around the girth weld. Wrap the sleeve (adhesive side down) around
the area to be coated. Make sure the
DIRAX sleeve wraps around the pipe and overlaps itself by at least 2
inches.
Gently preheat the
inside layer of the adhesive layer just next to the closure strip for 2 seconds
and press it down on the sleeve end on the pipe to form a tube (making it stick
to the other end of the sleeve).
Using the approved
torch, with a broad, bushy, yellow flame, start heating the closure area. As you see the closure begin to ‘soften’ pat
it down firmly with a gloved hand.
Continue heating and patting every few inches until the whole patch area
is finished. As the closure is properly
heated, you should see a light cross hatch texture appearing in the
closure.
Start heating (with a
broad, bushy, yellow flame) the sleeve at the side of the leading edge (the
side toward where the bore hole is).
Move the torch continuously CIRCUMFERENTIALLY (up and down) in a paint
brush motion all the way around the sleeve.
Work (moving torch up and down) from one end of sleeve; toward middle –
then toward other end of sleeve – always UP AND DOWN with yellow flame
contacting the sleeve.
Upon completion of
“shrink”, while the DIRAX is still hot and soft, run a small hand roller over
the overlap area (where one layer of sleeve overlaps onto the other layer of
sleeve, to push out any potential trapped air.
Pay particular attention to the weld and cutback area. Reheat any area if necessary. At this stage is when the temperature reading
can be taken on the backing of the sleeve with a contact pyrometer. Sleeve backing temperature is not to exceed
350F which can be easily achieved with installer taking care and working with
Torch at proper output levels (but must exceed 267F or the sleeve will not
shrink).
Main DIRAX sleeve is
complete when: sleeve has fully
conformed to the pipe / Protal and adjacent ARO; there are no cold spots or
dimples in the sleeve surface; there are no major blisters on the sleeve
surface, adhesive flow is evident on both edges after sleeve is cool.
It is now time to
install 3” wide leader strip on the side of the sleeve that will go into bore
hole first. That area should still be at
least 160F (but if not; it will be necessary to re-pre-heat).
Wrap the leading edge
/ wear cone over the transition between the DIRAX and the ARO. Make sure the closure for the wear cone is
placed away from the main sleeve closure.
Install this wear cone the same way as the DIRAX sleeve – wrapping
around pipe to overlap onto self; securing the closure and then shrinking the
wear cone with a broad, bushy, yellow flame.
Smooth down any edges
of the sleeve with the silicone roller.
Sleeve is fully recovered when: it is fully conformed to pipe surface /
Protal / Denso. There are no cold spots;
dimples. Profiles are visible beneath
sleeve. Adhesive flow evident on all
edges after sleeve has cooled. Sleeve
must be cooled to ambient temperature (and epoxy cured) before it should see
soil stresses.


No comments:
Post a Comment