Visit our website: www.jsicoatings.com
Call: (936) 321-3333
Email: steve@jsicoatings.com
Showing posts with label shrink sleeve installation. Show all posts

Monday, March 18, 2024

Does a Heat Shrink Sleeve Overlap Onto Itself?

 How Much Overlap is Needed Onto Adjacent Factory Applied Coating?


    When installing shrink sleeves; there are two very important bits of information to never lose site of:  OVERLAP and OVERLAP.  Let me explain:

    So the first important overlap:  The sleeve must wrap around the pipe and then OVERLAP back onto itself.  The sleeve does not 'butt up' to itself --- it overlaps onto itself.  This is critically important.  In this manner we can be certain that the sleeve will have enough shrink in it to properly seal to the pipe.  In addition at the area where the sleeve overlaps onto itself, the sealant will flow and fill during proper installation and fill any possible leak path there (with a belt and suspenders solution we will also roll that overlap with a silicon roller as one of the final steps of the installation process.

     The second important overlap discussion:  a sleeve needs to be wide enough to coat all bare steel and overlap onto the adjacent factory applied coating by at least 3" per side.  This makes certain that our seal extends out onto already proven (and jeeped) coating.  Now we will have at least a few inches of seal separating our bare steel from the outside world - leading to an excellent field joint coating that will properly prevent corrosion on that field joint for the life of the line.  

Monday, February 16, 2015

WPC Shrink Sleeve Installation Procedure

Two Piece WPC Heat Shrink Sleeve Install

     WPC sleeves (available in numerous different variations: WPCT, WPC100M, WPC60, WPC80, WPC120, WPC65M - though this post focuses specifically on the mastic coated sleeves and WPCT in particular) are composed of irradiated, modified polyolefin backing which upon brief exposure to a temperature in excess of 125C, will shrink from its expanded diameter (as supplied) to a predetermined recovered diameter.  The WPC sleeves are precoated internally with a controlled thickness of a thermally activated, self priming, rubber modified thermoplastic adhesive that provides an excellent bond to the metal pipe and yard applied coatings.

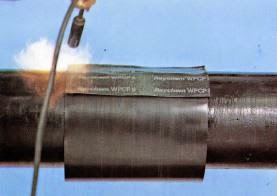
     During installation the sleeve is wrapped loosely over the joint and closed with a heat activated 'closure' patch (WPCPIV).  The patch is manufactured so that with proper heating the fiber mesh built into the closure backing becomes visible, giving the appearance of an alligator skin texture to the closure strip.

     Internally, the patch is coated with a heat activated high shear adhesive which assures a reliable closure.
Here you see the shrink sleeve and the closure strip as separate parts.
Now on to the install:

Step 1:  Joint Preparation.
  • Remove all weld spatter by grinding, filing or chipping
  • The exposed steel should be power brushed to a near white metal (as with all coatings, the cleaner the surface, the better the bond)
  • The steel and yard coated areas should be wiped clean of foreign materials such as dirt, rust, oil, grease and moisture just prior to installation.
  • The sleeves shall not be applied during rains or sandstorms unless portable welding tents or equivalent are used.  
  • Please note: WPCT (just like WPC65M and WPC100M) requires no primer or epoxy bonding agent.

power wire brush pipeline
Field joint being cleaned with a power wire brush


Step 2:  Preheating of the Joint Area

  •  Preheat the joint area and the adjacent yard coating using a propane torch, induction heater or ring burner.
  • WPCT to be preheated to a minimum temperature of 140F
  • WPC65M to be preheated to a minimum temperature of 165F
  • WPC100M to be preheated to a minimum temperature of 212F
  • It is always necessary to verify the temperature with tempil sticks, contact pyrometer or equivalent. 

FH2601 Torch Kit
Field joint preheating with a JS-2601 Torch Kit

pipeline preheat temperature
Verifying that proper preheat temperature has been reached
Step 3:
  • After preheating (and verifying preheat temp) remove the protective release paper and wrap the shrink sleeve centrally around the weld joint.  
  • The sleeve will overlap itself by at least 50mm

Wrap the sleeve around the pipe

Sleeve will overlap onto itself. 
Closure Patch
Closure secured at sleeve overlap.
heat shrink patch
Closure is secured using torch to activate the high shear adhesive.

shrink sleevepipe coating
Start shrinking on one end of sleeve and work toward other always shrinking circumferentially.

Continue shrinking sleeve until it fully conforms to pipe surface.

The finished WPCT sleeve will be fully conformed with weld bead visible.

Mastic flow will be evident at sleeve edges (this is where the seal is).


Friday, January 10, 2014

Torch for Shrinking Shrink Sleeves?

What Kind of Torch Should I Use When Installing Shrink Sleeves?

Propane Torch
A JS-2601 Torch Kit
         Question:  Does it matter what kind of torch you use to install our shrink sleeves?

     Answer:  Does it matter if you use a philips or a flathead screwdriver?  Does it matter if you use wood nails or masonry nails?  Does it matter if you use a chainsaw or a skill saw?  Of course it does.  No matter what project you are working on...you must have the right tool for the job!   The right tool for installing heat shrink sleeves on pipelines is the JS-2601 Torch. 

     I've seen it time and again:  men in the field trying to install our shrink sleeves with a welding torch; with a rosebud; with a torch that can practically double as the engine on the Space Shuttle Colombia.  It really is crazy; because those types of torches will not shrink the sleeve properly!

     The JS-2601 Torch Kit includes a torch head, a pilot light, a thirty foot hose, an adjustment know AND a regulator.  You simply supply the propane tank and you'll have everything else you need right there. 

     I know, I know...you've got a 12 year old weed burner out in your shop...and those cobwebs will come right off after you fire that torch up.  Sure, the hose is a little bit cracked....but it will hold for awhile.  Your torch also probably operates at whatever the bottle pressure is...that is not good. 

     You're working on a multi-million dollar pipeline.  Somebody spent tens of thousands of dollars paying for that pipeline to be coated in a factory.  Somebody spent thousands of dollars buying shrink sleeve to coat the field joints.  Please, please spend the couple hundred dollars to buy a torch that is designed to install these sleeves (and please spend the TENS of dollars to buy a silicone roller which is used as the final step during the installation process).  It doesn't make any sense to use a ratty old torch for installing shrink sleeves...there is just too much that can go wrong - and coating mistakes are incredibly, incredibly expensive.


Wednesday, January 1, 2014

Thermofit Tubular Pipe Sleeves (TPS) Installation Guide

Thermofit Tubular Pipe Sleeve (TPS) with Thermal Indicator Installation Guide

Materials and equipment:
1.Appropriate size TPS sleeve
2. Hose and Raychem torch (or equivalent)
3. Propane gas tank, regulator and gauge
4. Standard safety equipment such as gloves, goggles, hard hat, etc.

*Installation has to be done according to local government regulations and usual safety precautions.

Installation Instructions:


1. Before making the weld, slide the TPS over the pipe end, about 12 inches (300 mm) from the weld area. Note: Subsequent removal of the release film from the TPS sleeve on the pipe is easier if the release film has been loosened before the sleeve is placed on the pipe.

2. Clean the weld area with a hand or power wire brush to remove rust, dirt, weld splatter,and foreign materials.*Also, clean adjacent pipe coating that will be covered by the sleeve.
*Note: Coal tar - remove the outer paper wrap 6inches (150 mm) adjacent to the cutback to expose coal tar.Painted coatings - remove the whitewash paint on the surface of coating to be covered by the sleeve.

3. Preheat the joint until hot to the hand approximately 140°F (60°C) minimum.


4. Remove the inner protective release film of the sleeve. Center the sleeve over the preheated joint, allowing a 2-inch (50 mm)overlap on the mill coating.
Note: Adjust the flame to approximately 20 inches(500 mm), 6 psi regulator setting. The desired flame should be approximately 1/3 blue cone and 2/3 visible yellow.

5.Heat the sleeve, beginning in the center. Start at the bottom and move upward on both sides. Work to one end, then to the other as shrinkage occurs. Keep the torch moving and apply heat evenly around the sleeve until the pattern on the backing has disappeared and the backing has a smooth surface. During shrinkdown occasionally check mastic flow with gloved finger. Wrinkles should disappear automatically.

6.The sleeve is fully recovered when all of the following have occurred:
  • There are no cold spots on the sleeve surface.
  • The weld-bead profile is visible on the sleeve.
  • After the sleeve is cool, mastic flow is evident on both edges.
  • The pattern on the backing has disappeared and the backing has a smooth surface.